 Save to Pinterest
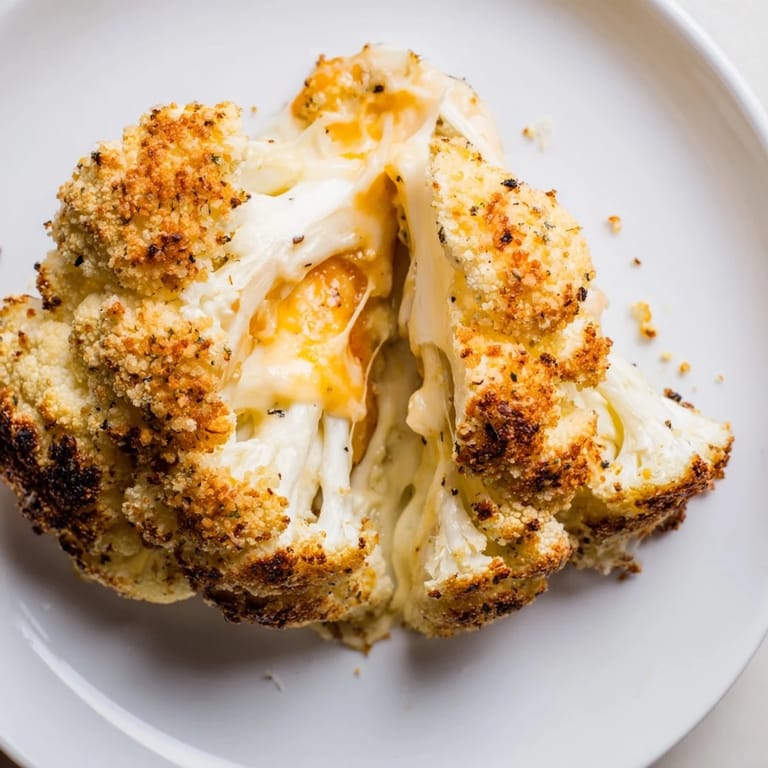
 My neighbor once brought a whole roasted cauliflower to a potluck, and I thought she was joking. But when she sliced into it and golden cheese oozed out, the entire table went silent. I made her write down the concept on a napkin before she left. That napkin stayed pinned to my fridge for weeks until I finally tried it myself, and now it shows up at every dinner party I throw.
The first time I served this, my brother-in-law asked if I ordered it from a restaurant. I didnt correct him until dessert. There is something deeply satisfying about watching people realize a whole vegetable can be the star of the meal, not just a side note. The way it slices into wedges like a cake makes everyone lean in a little closer.
Ingredients
- 1 large whole cauliflower (about 1 kg), leaves and stem trimmed but intact: The hero of the dish, so pick one that feels heavy and has tight, creamy white florets.
- 1 tbsp olive oil: Brushing this on the outside helps everything turn golden and crisp in the oven.
- ½ tsp salt: Seasons the exterior and balances the richness of the cheese inside.
- ¼ tsp black pepper: Just enough to add a subtle warmth without overwhelming the delicate cauliflower.
- 150 g cream cheese, softened: The creamy base that holds everything together and melts beautifully into the florets.
- 100 g shredded mozzarella cheese: Adds that perfect stretchy, gooey texture when you slice into it.
- 50 g grated Parmesan cheese: Brings a sharp, salty depth that keeps the filling from tasting flat.
- 2 tbsp chopped fresh chives: A gentle onion flavor that brightens the whole filling without overpowering it.
- 1 garlic clove, minced: One clove is enough to add warmth, more and it starts to compete with the cheese.
- ½ tsp smoked paprika: A secret ingredient that adds a hint of smokiness and a gorgeous color to the filling.
- ¼ tsp ground nutmeg: It sounds odd, but nutmeg and cheese are old friends, trust it.
- 1 tbsp milk: Loosens the filling just enough to make it easy to spread and stuff.
- 50 g shredded cheddar cheese: Mixed into the topping for extra sharpness and color.
- 2 tbsp breadcrumbs (gluten-free if needed): Adds a crispy, golden crust that contrasts beautifully with the tender cauliflower.
- 1 tbsp melted butter: Helps the breadcrumbs toast and stick to the surface.
Tired of Takeout? 🥡
Get 10 meals you can make faster than delivery arrives. Seriously.
One email. No spam. Unsubscribe anytime.
Instructions
- Preheat and Prep:
- Set your oven to 200°C (400°F) and line a baking tray with parchment paper. This keeps cleanup easy and prevents sticking.
- Trim the Cauliflower:
- Remove the outer leaves and carefully trim the base so it sits flat, but keep the core intact so the florets stay connected. A flat base makes all the difference when it bakes.
- Boil Until Tender:
- Bring a large pot of salted water to a boil, then submerge the cauliflower and cook for 8 to 10 minutes until just tender. Drain it well and let it cool slightly so you can handle it without burning your fingers.
- Make the Cheese Filling:
- In a mixing bowl, combine cream cheese, mozzarella, Parmesan, chives, garlic, smoked paprika, nutmeg, and milk until smooth. The mixture should be thick but spreadable.
- Create Space for Filling:
- Place the cooled cauliflower on the prepared tray and use a small knife to make deep cuts into the base and between florets. You are creating pockets, not breaking it apart.
- Stuff the Cauliflower:
- Gently stuff the cheese mixture into the crevices and center of the cauliflower, pressing it in with a spoon or your fingers. Do not be shy, pack it in there.
- Season the Outside:
- Brush the outside of the cauliflower with olive oil and sprinkle with salt and pepper. This step ensures the exterior gets golden and flavorful.
- Add the Topping:
- Mix cheddar cheese with breadcrumbs and melted butter, then sprinkle evenly over the top. This creates a crispy, cheesy crust.
- Bake Until Golden:
- Bake for 40 to 45 minutes, or until the cauliflower is golden, bubbling, and tender when pierced with a knife. The smell will tell you when it is ready.
- Rest and Serve:
- Let it rest for 5 minutes before slicing into wedges. Serve warm and watch everyone fight over the cheesiest pieces.
 Save to Pinterest
 One evening, I made this for a friend who swore she hated cauliflower. She ate two wedges and asked if I could teach her how to make it. We stood in my kitchen the following weekend, stuffing cheese into florets and laughing at how messy our hands got. That is when I realized this recipe is not just about the food, it is about the moment when someone discovers vegetables can be this exciting.
How to Choose the Right Cauliflower
Look for a head that feels heavy for its size and has tightly packed, creamy white florets with no brown spots. The leaves should be crisp and green, not wilted or yellowing. A smaller cauliflower will cook faster but may not have enough room for all the filling, so aim for one around 1 kg. If the florets are already separating at the store, skip it and find one with a firmer structure.
Make-Ahead and Storage Tips
You can boil the cauliflower and prepare the cheese filling up to a day in advance, then store them separately in the fridge. When you are ready to bake, just stuff, top, and slide it into the oven. Leftovers keep for up to three days in an airtight container and reheat beautifully in a 180°C oven for about 15 minutes. The filling may lose a bit of its gooeyness, but the flavor stays rich and comforting.
Serving Suggestions and Variations
This pairs beautifully with a crisp green salad dressed in lemon vinaigrette or a side of roasted cherry tomatoes. If you want to make it heartier, serve it over a bed of quinoa or couscous to soak up the cheesy bits. You can also fold in chopped sun-dried tomatoes, sautéed mushrooms, or even cooked bacon into the filling for extra depth.
- Swap chives for fresh parsley, dill, or basil depending on what you have.
- Add a pinch of red pepper flakes to the filling if you like a little heat.
- Use panko breadcrumbs for an extra-crispy topping.
 Save to Pinterest
 Every time I pull this out of the oven, I feel like I am unveiling something special. It never stops being impressive, even to me.
Common Recipe Questions
- → How do I prevent the cauliflower from becoming mushy?
Pre-cook the cauliflower for only 8-10 minutes until just tender, not fully cooked. This initial blanching softens it slightly while maintaining structural integrity. The final baking completes the cooking process without overdoing it.
- → Can I prepare this dish ahead of time?
Yes, you can stuff the cauliflower up to 4 hours in advance and refrigerate it covered. Bake directly from cold, adding 5-10 minutes to the cooking time. This makes it perfect for entertaining and meal planning.
- → What cheese combination works best?
The three-cheese blend provides balanced flavor and texture: cream cheese adds richness and creaminess, mozzarella melts smoothly, and Parmesan delivers sharp, nutty notes. For stronger flavor, increase Parmesan to 75g and reduce mozzarella accordingly.
- → How do I know when the cauliflower is fully cooked?
Pierce the thickest part of the head with a fork or knife—it should pass through easily. The cauliflower should also be visibly golden on top with some charring on the florets, and the cheese filling should be bubbling at the edges.
- → What sides pair well with this dish?
Serve alongside fresh greens with vinaigrette, roasted root vegetables, or Mediterranean salad to balance the richness. A crisp white wine like Sauvignon Blanc or Pinot Grigio complements the cheesy, earthy flavors beautifully.
- → Can I modify the filling with other ingredients?
Absolutely. Mix in sautéed mushrooms, sun-dried tomatoes, caramelized onions, or crispy bacon for depth. Fresh herbs like dill, tarragon, or basil work wonderfully instead of chives. Keep the cream cheese base for structural integrity.