 Save to Pinterest
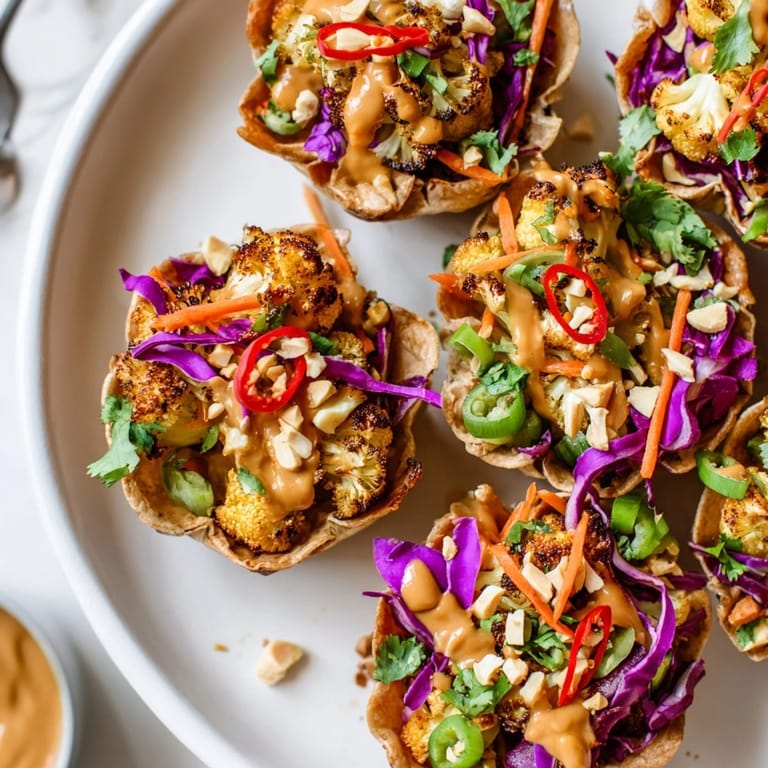
 Thai Peanut Cauliflower Taco Cups are my answer to the question What can I serve that is fun and totally bursting with flavor This recipe turns simple vegetables and tortillas into a crunchy hand-held treat layered with smoky roasted cauliflower and drizzled with a creamy Thai-inspired peanut sauce. These are absolute crowd-pleasers for gatherings but make a seriously tasty solo lunch too.
I served these at a backyard picnic and even the meat eaters went back for seconds I have made them again and again as a playful way to pack everyone with extra veggies
Ingredients
- Cauliflower florets: look for a head that feels heavy for its size and has tightly packed white clusters this keeps texture hearty and roasts perfectly
- Olive oil: choose extra virgin for the best flavor depth
- Soy sauce or tamari: adds salty complexity and helps season every floret use a low sodium option if preferred
- Ground cumin: brings warm earthiness and works magic with cauliflower
- Smoked paprika: introduces subtle smoky notes try Spanish smoked paprika for the boldest taste
- Salt and black pepper: enhances each layer and brings out the vegs sweetness
- Creamy peanut butter: classic Thai style richness also works great with sunflower seed butter for nut free swaps choose a brand with minimal added sugar
- Lime juice: adds a zingy lift fresher limes offer more brightness
- Maple syrup or honey: balances savory elements with a touch of sweetness opt for pure maple syrup if you have it
- Toasted sesame oil: supplies that unmistakable toasty depth to the sauce seek a dark amber bottle for max flavor
- Garlic: the backbone of the sauce grate it fresh to unlock its aroma
- Small flour or corn tortillas: seek out 5 to 6 inch rounds corn for gluten free or flour for soft crisp cups both toast beautifully
- Shredded red cabbage: offers crunch and vibrant color pick a tight shiny head for best results
- Carrot: adds gentle sweetness and texture choose medium sized for easy grating
- Chopped fresh cilantro: gives garden brightness go for deep green leaves with no yellowing
- Green onions: deliver a mild bite slice them thin for pretty garnishing
- Red chili: brings subtle heat totally optional best with small red chilies for max flavor
- Chopped roasted peanuts: amp up the crunch but skip for nut free needs make sure they are unsalted and freshly chopped for the ultimate crunch
Tired of Takeout? 🥡
Get 10 meals you can make faster than delivery arrives. Seriously.
One email. No spam. Unsubscribe anytime.
Instructions
- Roast the Cauliflower:
- Break a medium head of cauliflower into small bite sized florets. Toss them in a large mixing bowl with olive oil soy sauce ground cumin smoked paprika salt and black pepper. Mix well so every piece is coated evenly. Scatter in a single layer on a baking sheet and roast at 400 degrees Fahrenheit for about 20 to 25 minutes. Midway through stir the florets to ensure even caramelization. The goal is tender pieces with crispy golden edges.
- Make the Peanut Sauce:
- While the cauliflower roasts grab a small bowl and add creamy peanut butter soy sauce lime juice maple syrup toasted sesame oil and minced garlic. Whisk thoroughly until silky smooth. To thin pour in one tablespoon of warm water at a time. The ideal texture is thick enough to coat a spoon but fluid so it can drizzle over taco cups. Set aside so flavors meld.
- Prepare the Taco Cup Shells:
- Gently warm your tortillas so they become a little more pliable this step keeps them from cracking. Either microwave them briefly covered with a damp towel or lightly heat in a skillet. Take a 12 cup muffin tin and lightly grease each cup. Press each tortilla into a cup to make a shell gently pleating the edges to fit. Bake at 400 degrees Fahrenheit for eight to ten minutes until shells are crisp and lightly golden. Remove and let cool in the tin so they hold shape.
- Assemble the Taco Cups:
- Spoon a generous amount of warm roasted cauliflower into each taco shell. Drizzle with the creamy peanut sauce so it nestles into the cauliflower crevices. Scatter shredded cabbage carrot cilantro green onions red chili if using and chopped roasted peanuts generously on top. The layering is part of the fun let everyone add their favorites.
- Serve and Enjoy:
- Arrange taco cups on a platter and serve right away for optimal crunch. The shells are at their best while fresh from the oven and the contrasts between warm filling and cold toppings really pop.
 Save to Pinterest
 I am always amazed at how roasted cauliflower transforms in this dish It turns so golden and hearty that even kids in my house forget they are eating pure veggies Last summer we had an outdoor taco bar and the peanut sauce totally stole the show
Storage Tips
Store assembled taco cups uncovered in the fridge for up to twenty four hours though the shells will soften the longer they sit For meal prep prepare the roasted cauliflower and sauce in advance and keep the taco cups and toppings separate in airtight containers Assemble right before serving to keep things ultra crunchy
Ingredient Substitutions
For allergies or dietary needs opt for sunflower seed butter instead of peanut butter and leave off the peanuts for nut free Use corn tortillas and tamari to go gluten free Swap in spiralized zucchini or quick pickled veggies as toppings if you are running low on cabbage or carrots The cauliflower can be swapped for roasted chickpeas or sweet potato chunks for a seasonal turn
Serving Suggestions
Set up a taco bar with the fillings and toppings in small bowls and let guests build their dream taco cup These pair beautifully with chilled white wine spiked green tea or Thai inspired cocktails For a heartier dinner offer alongside rice or quinoa and a crisp salad
Cultural and Seasonal Adaptations
This recipe is a fusion the playful crunch of Mexican street tacos partnered with aromatic Thai flavors like lime and peanut For a winter twist add roasted sweet potato or butternut squash instead of cauliflower In summer I love to add crunchy cucumber ribbons and a big handful of fresh mint
Success Stories
These taco cups have turned plenty of doubters into roasted cauliflower fans I once served them at a family reunion and they disappeared before the main course was ready A friend adapted the recipe for her kids lunchboxes with smaller shells and a milder peanut sauce both kids gave it a ten out of ten
Freezer Meal Conversion
You can freeze the roasted cauliflower filling and the peanut sauce separately in airtight containers for up to two months The tortillas can be shaped and baked ahead cool completely then store in a zippered bag When ready to serve reheat cauliflower and taco cups in the oven assemble and finish with fresh toppings and sauce
 Save to Pinterest
 Taco cups can be filled with nearly any roasted veg in season For easy cleanup line your muffin tin with parchment strips to lift cups out Taco cups are best eaten fresh before the shell absorbs too much moisture
Common Recipe Questions
- → How do I keep the taco cups crunchy?
Bake the tortilla shells until golden and cool slightly before filling; serve immediately for best crunch.
- → Can I make these gluten-free?
Yes, simply use corn tortillas and tamari instead of soy sauce.
- → What’s a nut-free alternative for the peanut sauce?
Replace peanut butter with sunflower seed butter and omit peanuts from the toppings.
- → Are these vegan-friendly?
Use plant-based sweeteners and double-check tortillas and sauce ingredients for a vegan option.
- → How can I add extra freshness?
Top with diced avocado or a squeeze of lime juice before serving.
- → Which tools are needed for preparation?
You’ll need a baking sheet, muffin tin, mixing bowls, whisk, knife, and cutting board.
- → Can I prepare the cauliflower ahead?
You can roast cauliflower in advance and warm slightly before assembling the cups.