 Save to Pinterest
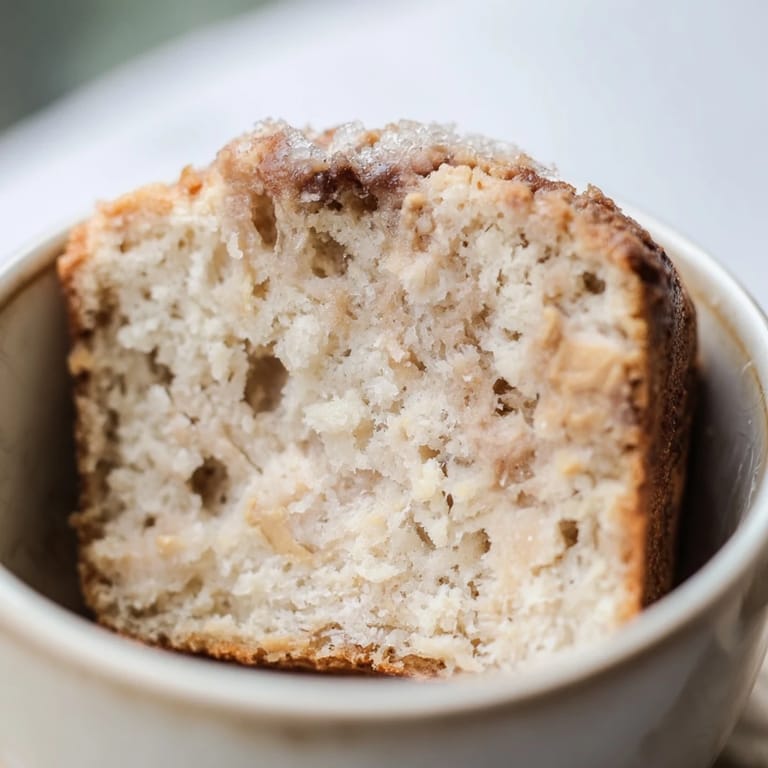
 Late one Tuesday night, I stood in my kitchen staring into an empty pantry, craving something sweet but unwilling to turn on the oven. That's when I spotted the peanut butter jar and remembered an old college trick: mug cakes. I grabbed a mug, cracked an egg, and two minutes later I was eating something that tasted like a warm peanut butter cloud. It wasn't fancy, but it was exactly what I needed. Since then, this little recipe has saved me more times than I can count.
I made this for my sister once when she showed up at my door after a rough day at work. She sat at my counter, watched me stir everything together in under three minutes, and laughed when I handed her a spoon and the mug itself. She ate the whole thing in silence, then asked me to text her the recipe. Now she makes it every Friday night as her little weekly reward. It's become her thing, and I love that something so simple turned into a ritual for her.
Ingredients
- Creamy peanut butter: This is the heart of the cake. I always use the regular kind, not natural, because it melts smoother and gives you that classic peanut butter sweetness.
- Unsalted butter, melted: It adds richness and helps the cake stay moist. I melt mine in the mug first to save a step.
- Large egg: One egg is all you need to bind everything together and give the cake structure. Make sure it's at room temperature so it blends easily.
- Milk: Any kind works. I've used almond milk, oat milk, and regular dairy milk with no difference in texture.
- Vanilla extract: Just half a teaspoon, but it rounds out the flavor and makes the whole thing smell amazing.
- All-purpose flour: Three tablespoons is the magic number. Any more and the cake gets dense. Any less and it falls apart.
- Granulated sugar: Two tablespoons give it just enough sweetness without making it cloying.
- Baking powder: A tiny quarter teaspoon makes the cake rise and turn fluffy in the microwave.
- Salt: A pinch balances the sweetness and brings out the peanut butter flavor.
Tired of Takeout? 🥡
Get 10 meals you can make faster than delivery arrives. Seriously.
One email. No spam. Unsubscribe anytime.
Instructions
- Melt and Mix the Base:
- In your mug, stir together the peanut butter and melted butter until they form a smooth, glossy mixture. This takes about 20 seconds with a fork.
- Add the Wet Ingredients:
- Crack in the egg, pour in the milk and vanilla, then whisk everything with your fork until it's completely combined and a little frothy. Don't leave any streaks of egg white.
- Stir in the Dry Ingredients:
- Add the flour, sugar, baking powder, and salt directly into the mug. Stir gently until just mixed. A few tiny lumps are fine; overmixing makes the cake tough.
- Microwave:
- Pop the mug in the microwave and cook on high for 60 to 75 seconds. Watch it rise like magic. The center should look set, not wet or jiggly.
- Cool and Enjoy:
- Let it sit for a minute or two so you don't burn your tongue. Then grab a spoon and dig in right from the mug.
 Save to Pinterest
 One winter evening, my nephew asked if we could bake cookies together. I didn't have the energy for a full baking project, so I taught him how to make this instead. He cracked the egg himself, stirred the batter with intense focus, and watched through the microwave door as the cake puffed up. When it was done, he took one bite and declared it the best dessert he'd ever had. I didn't correct him. Sometimes the best recipes are the ones that feel like a small adventure.
How to Customize Your Mug Cake
This recipe is forgiving and loves a little creativity. I've stirred in mini chocolate chips before microwaving, and they melt into gooey pockets throughout the cake. Sometimes I swirl in a spoonful of jam or Nutella for a surprise in the middle. If you want crunch, sprinkle crushed pretzels or granola on top before eating. You can also swap the peanut butter for almond butter or cashew butter, though the flavor will shift a bit. I've even made it with sunflower seed butter when cooking for a friend with a peanut allergy, and it worked beautifully.
What to Serve with It
This mug cake is perfect on its own, but a scoop of vanilla ice cream on top turns it into something special. The cold ice cream melts into the warm cake and creates a sauce that pools at the bottom of the mug. I've also drizzled honey over it when I wanted something a little less sweet, and the floral notes played nicely with the peanut butter. A handful of fresh berries on the side adds a bright, tart contrast. If you're feeling indulgent, a dollop of whipped cream and a sprinkle of sea salt make it taste like a dessert from a cafe.
Troubleshooting and Storage
If your cake turns out dense, you probably overmixed the batter or used too much flour. Measure carefully and stir just until the dry ingredients disappear. If it comes out dry, reduce the microwave time by 10 seconds next time. Microwaves vary a lot in power, so you might need to experiment once or twice to find your sweet spot. This cake is best eaten fresh and warm, but if you have leftovers, you can cover the mug and refrigerate it for up to a day. Reheat for 15 seconds before eating.
- Use a fork instead of a whisk for easier cleanup and less overmixing.
- Let the butter and peanut butter melt together first so they blend more smoothly.
- Check the cake at 60 seconds. You can always add more time, but you can't undo overcooking.
 Save to Pinterest
 This mug cake has become my go-to for nights when I need comfort without effort. It's proof that something simple and quick can still feel like a treat. I hope it brings you the same quiet satisfaction it's brought me.
Common Recipe Questions
- → Can I use dairy-free milk alternatives?
Yes, almond or oat milk works well and does not affect the texture significantly.
- → How do I avoid overcooking the cake in the microwave?
Microwave for 60-75 seconds and check for a risen center. Let it cool briefly to finish cooking gently.
- → What can I add for extra flavor?
Try chocolate chips, a drizzle of honey, or a scoop of ice cream for added indulgence.
- → Is natural peanut butter recommended?
Natural peanut butter offers a richer, less sweet flavor that complements the cake nicely.
- → Can I substitute gluten-free flour?
Yes, using a 1:1 gluten-free blend works to maintain texture and flavor in the cake.