Save to Pinterest
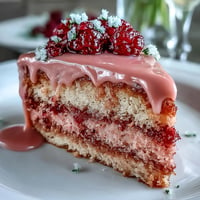
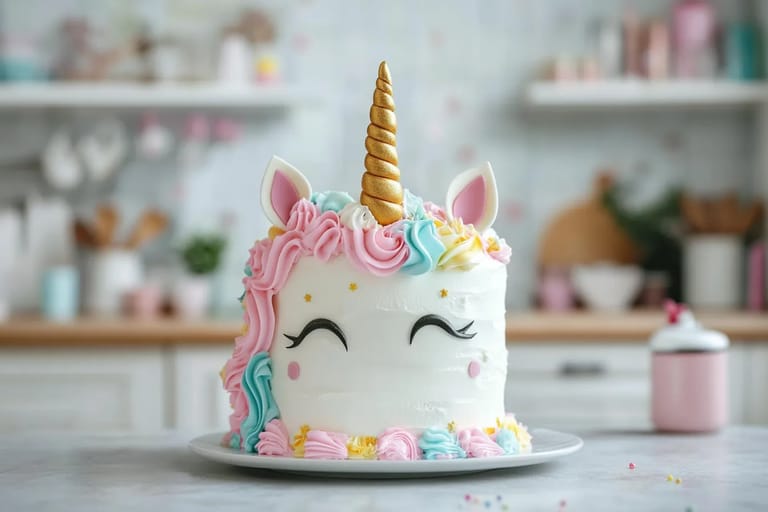
 This unicorn cake transforms a simple round cake into a magical creation that will delight children of all ages. I created this recipe after my daughter begged for a "fancy unicorn cake" for her birthday, but I didn't have time for an elaborate tiered masterpiece. This quick solution became our family's go-to special occasion treat!
Making this unicorn cake has become our mother-daughter bonding ritual. Every birthday, we choose new color combinations and my daughter always insists on adding extra sprinkles to the mane.
Ingredients
- One 10‑inch round cake The foundation of your unicorn magic. Use your favorite flavor homemade or box mix for personalization.
- 1 cup pastel-colored icing Choose colors that complement your party theme. Gel food coloring gives more vibrant results than liquid.
- 1½ cups white icing Creates the clean base for your unicorn face and body. Buttercream holds shape better than whipped varieties.
- ¼ cup gold-colored or yellow icing Makes the magical unicorn horn pop. Add edible gold dust for extra sparkle if available.
- 2 tablespoons black icing Critical for creating facial features. A small amount goes a long way.
- Offset spatula or butter knife Essential for smooth frosting application. Warming metal tools slightly helps spread frosting more easily.
- Piping bags with star piping tips Creates the textured mane effect. Different star tip sizes create varied textures for a more realistic mane.
Tired of Takeout? 🥡
Get 10 meals you can make faster than delivery arrives. Seriously.
One email. No spam. Unsubscribe anytime.
Step-by-Step Instructions
- Prepare the cake
- Bake your 10-inch round cake using your preferred recipe or mix. Allow it to cool completely on a wire rack for at least 1 hour. Working with a fully cooled cake prevents the icing from melting and creates a sturdier base for decorating.
- Shape the unicorn
- Place the cooled cake on a flat cutting surface. Using a sharp knife, cut a small wedge approximately 2 inches wide from one side of the cake. This removed piece will become the ear and horn. The exact position depends on how you envision your unicorn but typically works best when cut from what will be the top of the head.
- Arrange the pieces
- Position your cake on a serving platter or cake board. Place the main round portion as the unicorn face. Take the wedge piece you cut and split it into two uneven portions. The smaller piece will become the ear placed along the side of the head. The larger piece will be positioned at the top of the head to form the base of the horn.
- Create the base coat
- Cover the entire cake including the horn and ear pieces with white icing using your offset spatula. Work from the top down with smooth strokes. This first layer seals in crumbs and provides the clean unicorn foundation. For best results, apply a thin crumb coat first, chill for 15 minutes, then add a second layer of frosting.
- Define the horn
- Fill a piping bag with gold or yellow icing. Pipe in a spiral pattern starting from the base of the horn piece working upward to create the iconic unicorn horn shape. For the ear, apply pink frosting to create a realistic inner ear effect. The contrast between the gold horn and pink ear creates visual interest.
- Create the magical mane
- Fill separate piping bags with your chosen pastel colors fitted with star tips. Starting from behind the horn, pipe clusters of stars in a curved pattern down one side of the unicorn face to create a flowing mane. Alternate colors for a rainbow effect. Apply varying pressure to create different sized "hair" clusters for added dimension.
- Add personality details
- Use black icing to pipe a closed eye with lashes on one side of the face. Create a small smile curve below the center of the face and add a tiny nostril. These simple features instantly bring your unicorn to life. Keep facial features minimal and centered on one side for the classic unicorn profile look.
 Save to Pinterest
 My favorite part of making this unicorn cake is watching children's faces light up when they see it. My daughter once told me that her unicorn cake made her "feel magical inside," which is exactly the kind of childhood memory I want to create through baking.
Make-Ahead Options
This unicorn cake can be prepared in stages to fit busy schedules. Bake the cake up to two days in advance and store well-wrapped at room temperature. You can also frost the base coat of white icing the night before and refrigerate the cake covered loosely with plastic wrap. Complete the decorative elements like the mane horn and facial features a few hours before serving for the freshest appearance.
Allergen Adaptations
This magical design works beautifully with alternative cake recipes. For gluten-free guests, substitute your favorite gluten-free cake mix or recipe for the base cake. Dairy-free frosting options made with vegetable shortening or coconut cream can replace traditional buttercream. Natural food dyes derived from plant sources create beautiful pastel colors for families avoiding artificial colorings.
Serving Suggestions
Serve this unicorn cake as the centerpiece of a magical themed party. Complement with rainbow fruit skewers, star-shaped sandwiches, and pastel-colored beverages. For an extra magical touch, add edible glitter sprinkles or pearl dragées to the serving plates. The cake pairs wonderfully with vanilla ice cream or a scoop of sherbet in coordinating colors.
Save to Pinterest Common Recipe Questions
- → What type of cake works best for the unicorn design?
Any 10-inch round cake works well for this unicorn design. You can use your favorite cake flavor - vanilla, chocolate, funfetti, or any other preferred option. The decorating technique focuses on shaping and frosting rather than the cake base itself.
- → Can I make this unicorn cake in advance?
Yes! You can prepare this unicorn cake 1-2 days in advance. After decorating, store it in a cake container in the refrigerator. For best results, bring it to room temperature about 30 minutes before serving to allow the frosting to soften.
- → What piping tips work best for the unicorn's mane?
Star piping tips are ideal for creating the unicorn's mane. Medium-sized star tips like Wilton 1M or 2D work perfectly for larger swirls, while smaller star tips like Wilton #18 or #21 are great for adding texture and detail to the colorful mane.
- → How can I make the unicorn horn stand up without falling?
For a sturdy unicorn horn, ensure your frosting is firm enough (refrigerate briefly if needed). You can also insert a toothpick through the horn piece into the main cake for additional support. Another option is creating a cone-shaped horn from fondant or modeling chocolate.
- → What alternatives can I use for colored frosting?
If you don't have colored frosting, you can easily make your own by adding food coloring to white frosting. Gel food colors work best as they provide vibrant colors without thinning the frosting. For the gold horn, you can use gold edible spray or gold luster dust mixed with a bit of clear alcohol on yellow frosting.
- → Can I adapt this design for cupcakes?
Absolutely! Create unicorn cupcakes by frosting each cupcake with white icing, then add a small swirl of pastel colors for the mane, a yellow frosting horn, and simple facial features. This makes for adorable individual servings perfect for parties.