 Save to Pinterest
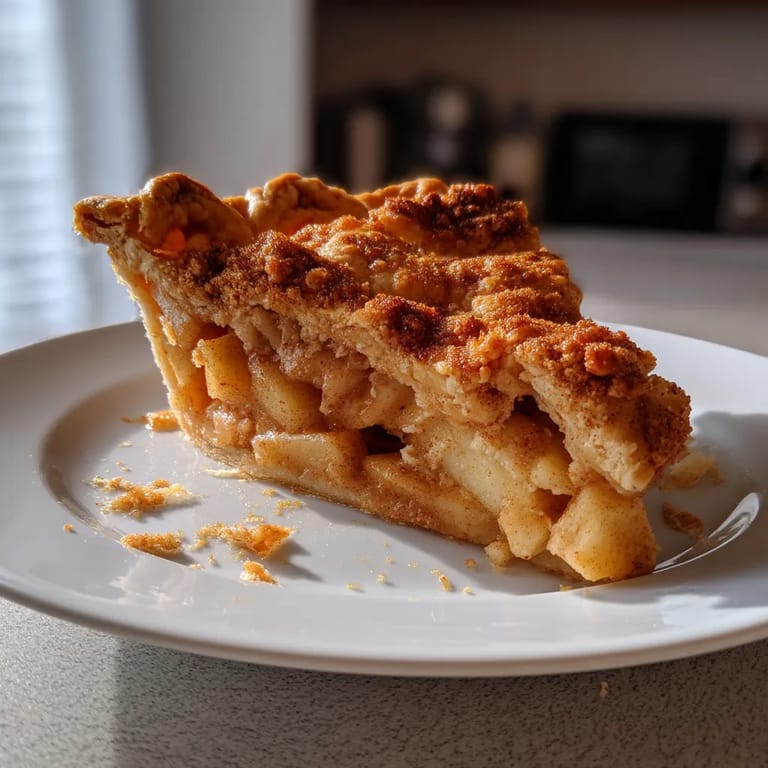
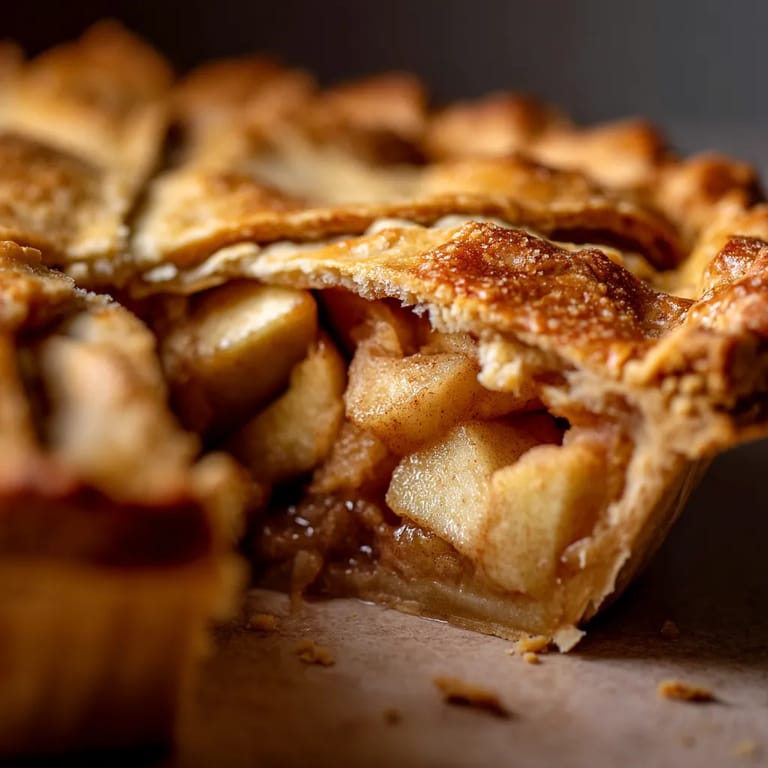
 This apple pie recipe transforms the classic dessert into something truly extraordinary with its cinnamon-spiced crust that perfectly complements the sweet-tart filling of juicy apples. After years of baking traditional apple pies, I discovered that adding cinnamon directly to the crust creates an aromatic experience that elevates every bite.
I first developed this recipe for my daughter's birthday when she requested "something better than regular apple pie." The cinnamon crust was such a hit that it's now our signature family dessert, appearing at every holiday and special occasion.
Ingredients
- All purpose flour provides structure while remaining tender when handled properly look for unbleached varieties for the best flavor
- Granulated sugar adds just enough sweetness to the crust without making it too sweet
- Ground cinnamon infuses the crust with warm spice notes choose Ceylon cinnamon for a more complex flavor
- Cold unsalted butter creates those essential flaky layers be sure it's very cold and cut into small cubes
- Ice water helps bind the dough without activating too much gluten use filtered water for the cleanest taste
- Granny Smith or Honeycrisp apples offer the perfect balance of tartness and structure choose firm apples that hold their shape when baked
- Brown sugar adds caramel notes that regular sugar cannot provide dark brown gives even deeper flavor
- Nutmeg complements the cinnamon with its subtle warmth freshly grated makes a noticeable difference
- Lemon juice brightens the filling and prevents apple browning use fresh rather than bottled
- Vanilla extract adds depth and complexity use pure extract rather than imitation
Tired of Takeout? 🥡
Get 10 meals you can make faster than delivery arrives. Seriously.
One email. No spam. Unsubscribe anytime.
Step-by-Step Instructions
- Make the Cinnamon Crust
- Whisk together flour, sugar, cinnamon, and salt in a large bowl until completely combined. The cinnamon should be evenly distributed throughout the flour mixture, creating tiny specks of spice that will flavor the entire crust. Add the very cold butter cubes and work quickly with your fingertips or a pastry cutter, pressing and breaking the butter into the flour until you achieve a mixture that looks like coarse breadcrumbs with some pea-sized pieces remaining. These varying butter sizes create different textures in the finished crust.
- Bring the Dough Together
- Drizzle ice water one tablespoon at a time over the flour mixture, using a fork to gently incorporate it. Add just enough water until the dough begins to hold together when pinched between your fingers. Too much water makes a tough crust, while too little means it will crumble. Gather the dough with your hands, dividing it into two equal portions. Form each into a flat disc about 1 inch thick, wrap tightly in plastic wrap, and refrigerate for at least one hour or up to two days. This resting period allows the gluten to relax and the moisture to distribute evenly.
- Prepare the Apple Filling
- Peel, core, and slice the apples into uniform, thin slices about 1/4 inch thick. Consistent thickness ensures they cook evenly. In a large mixing bowl, combine the sliced apples with both sugars, cinnamon, nutmeg, flour, lemon juice, and vanilla extract. Toss gently but thoroughly until every apple slice is coated with the sugar and spice mixture. Let the mixture sit for about 15 minutes to allow the apples to release some of their juices, which will create a more concentrated flavor in the filling.
- Assemble the Pie
- Preheat your oven to 400°F and place a baking sheet on the middle rack to preheat as well. On a lightly floured surface, roll out one disc of dough to a 12inch circle about 1/8 inch thick. Work from the center outward, rotating the dough occasionally to maintain a circular shape. Transfer the dough to a 9inch pie plate by loosely rolling it around your rolling pin and then unrolling it over the plate. Gently press the dough into the bottom and sides without stretching it. Pour in the apple filling, including any accumulated juices, and mound it slightly higher in the center.
- Create the Top Crust
- Roll out the second disc of dough to the same dimensions as the first. Place it over the filling, trim any excess dough leaving about a 1inch overhang, then fold the edge of the top crust under the bottom crust edge. Crimp the edges decoratively using your fingers or a fork to seal completely. Cut 5 to 6 small slits in the top crust to allow steam to escape during baking. Beat an egg with a tablespoon of water and brush this mixture lightly over the entire top crust for a golden, shiny finish.
- Bake to Golden Perfection
- Place the pie on the preheated baking sheet in the oven. Bake at 400°F for 20 minutes to set the crust, then reduce the temperature to 350°F and continue baking for 30 to 35 minutes more. The pie is done when the crust is deeply golden brown and the filling is bubbling through the vents. If the edges begin to darken too quickly, shield them with strips of aluminum foil. The preheated baking sheet helps ensure the bottom crust bakes properly, preventing the dreaded soggy bottom.
- Cool Completely
- Transfer the baked pie to a wire rack and allow it to cool for at least 2 hours before slicing. This cooling period is crucial as it allows the filling to set properly. Cutting into a hot pie will result in a runny filling that spills out of each slice. The flavors also continue to develop as the pie cools, resulting in a more complex taste experience.
 Save to Pinterest
 The cinnamon in the crust was initially an accident when I was baking with my son and he misunderstood my instructions. He added cinnamon to both the filling and the crust mixture, and what seemed like a mistake turned into our family's signature touch. Now everyone asks for "that special apple pie with the spiced crust" at gatherings, proving that sometimes kitchen accidents lead to the most delicious traditions.
The Perfect Apple Selection
The type of apple you choose dramatically impacts your pie's final texture and taste. Granny Smith apples provide tartness and hold their shape well during baking, preventing a mushy filling. Honeycrisp offers a wonderful sweetness while still maintaining structure. For the absolute best flavor complexity, use a combination of both varieties. Avoid Red Delicious apples, which break down too much during baking and lack the necessary acidity to balance the sweetness of the pie. The ideal apple should feel firm and heavy for its size, with no soft spots or wrinkles.
Make-Ahead Options
This cinnamon crust apple pie works beautifully as a make-ahead dessert. Prepare the dough up to three days in advance and keep it refrigerated, or freeze it for up to three months. When ready to use frozen dough, thaw overnight in the refrigerator. You can also fully assemble the unbaked pie and freeze it solid, then wrap it tightly in plastic wrap and aluminum foil. Bake directly from frozen, adding about 15 minutes to the baking time. For maximum convenience, bake the pie completely, cool it, then freeze. Thaw overnight in the refrigerator and warm in a 350°F oven for 15 minutes before serving.
Serving Suggestions
While this pie is spectacular on its own, certain accompaniments elevate it even further. Serve warm slices with a scoop of vanilla bean ice cream, allowing it to melt slightly into the filling for a creamy contrast to the spiced apples. For special occasions, try a drizzle of warm caramel sauce over the top. During fall and winter holidays, pair with a mug of hot mulled cider or spiced tea. For a cheese lover's delight, serve alongside aged cheddar cheese, a traditional pairing in New England and parts of Europe that creates a delightful sweet-savory balance.
Save to Pinterest Common Recipe Questions
- → What are the best apple varieties for this pie?
Granny Smith and Honeycrisp apples work best because they offer the perfect balance of tartness and sweetness while maintaining their structure during baking. You can also use a combination of apple varieties like Braeburn, Pink Lady, or Jonagold for more complex flavor.
- → Can I make the dough in advance?
Yes! The cinnamon pie crust dough can be made up to 3 days in advance and stored in the refrigerator. You can also freeze the dough discs for up to 3 months - just thaw overnight in the refrigerator before rolling out.
- → Why does my pie filling become watery?
Watery filling typically results from either not using enough thickener (flour or cornstarch) or not allowing the pie to cool completely before cutting. The flour in this filling thickens the juices as they bubble during baking, but these juices need time to set as the pie cools for at least 2 hours.
- → How do I prevent a soggy bottom crust?
For a crisp bottom crust, try blind baking the bottom crust for 10 minutes before adding filling, using a metal or glass pie plate that conducts heat well, or baking the pie on the lowest oven rack. You can also brush the bottom crust with beaten egg white before adding the filling.
- → Can I freeze the assembled pie?
Yes, you can freeze the unbaked assembled pie for up to 3 months. Wrap it tightly in plastic wrap followed by aluminum foil. When ready to bake, do not thaw - place directly in a preheated oven and add 15-20 minutes to the baking time.
- → What's the purpose of the egg wash?
The egg wash serves two important purposes: it gives the baked crust a beautiful golden-brown shine, and it also helps seal the edges of the pie where the top and bottom crusts meet, preventing the filling from bubbling out during baking.