 Save to Pinterest
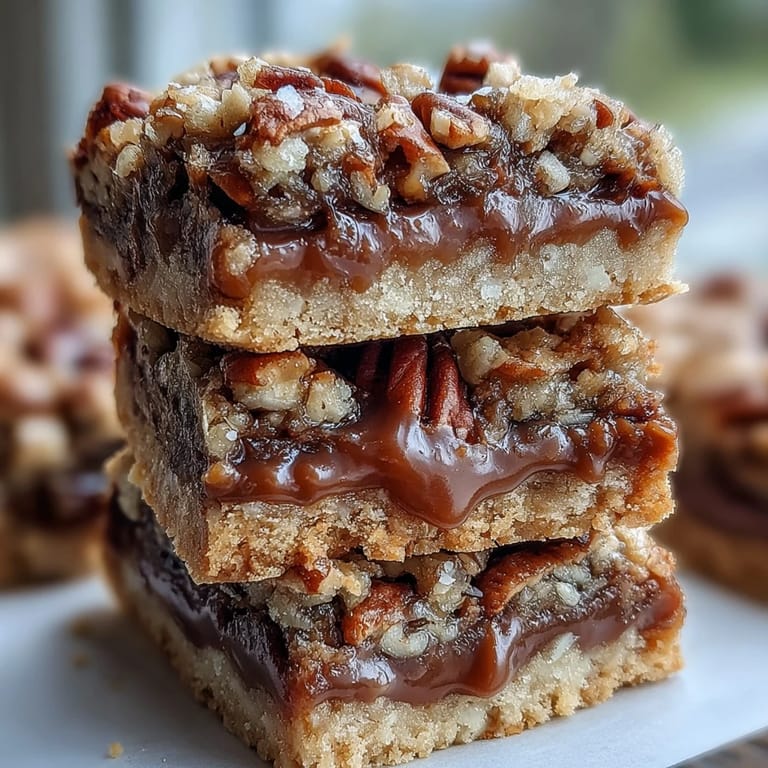
 The scent of butter and brown sugar caramelizing in my oven always takes me back to that rainy Sunday when I first created these turtle bars. My kitchen windows were fogged with condensation as I experimented with combining my grandmother's oatmeal cookie recipe with the decadent flavors of turtle candies. The melted chocolate chips and warm caramel sauce swirled together in such a beautiful pattern that I knew before the first bite these would become legendary in my household.
Last Christmas, I brought a double batch to our neighborhood exchange and watched as people who claimed they were too full for dessert suddenly found room for seconds. My friend Elena, who typically avoids sweets, asked for the recipe while helping herself to a third piece, whispering that she was planning to make them for her book club. The look of bliss on everyones faces as the chewy, caramelly bites melted in their mouths made me feel like Id given them all a proper hug through food.
Ingredients
- Rolled oats: The backbone of these bars, providing that homey, toasty flavor that contrasts beautifully with the sweet elements, though I learned that quick oats will make your bars too dense.
- Caramel sauce: Store bought works perfectly well here, but Ive found that using the thicker premium varieties prevents the dreaded leaking sides that plagued my early attempts.
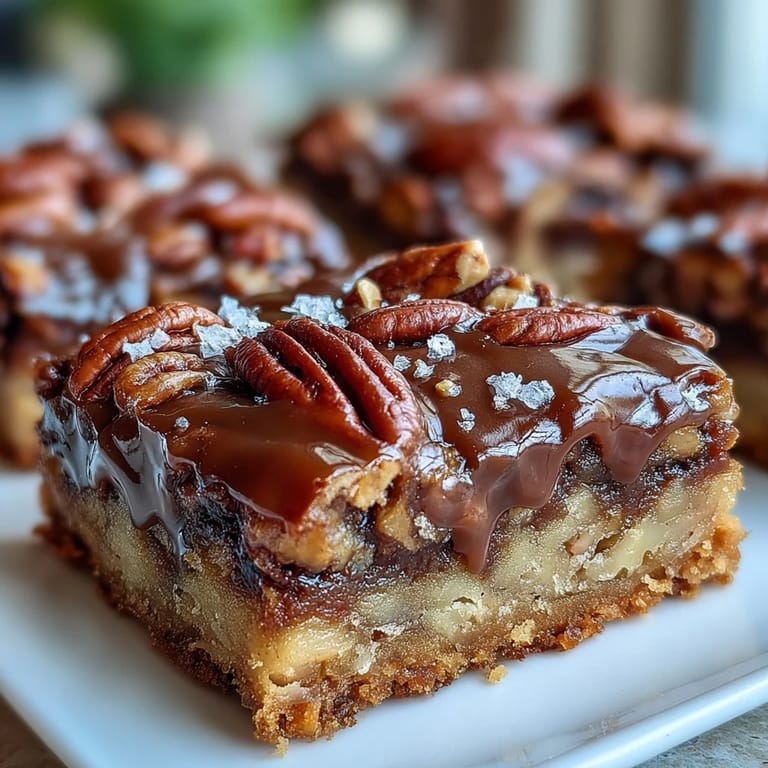
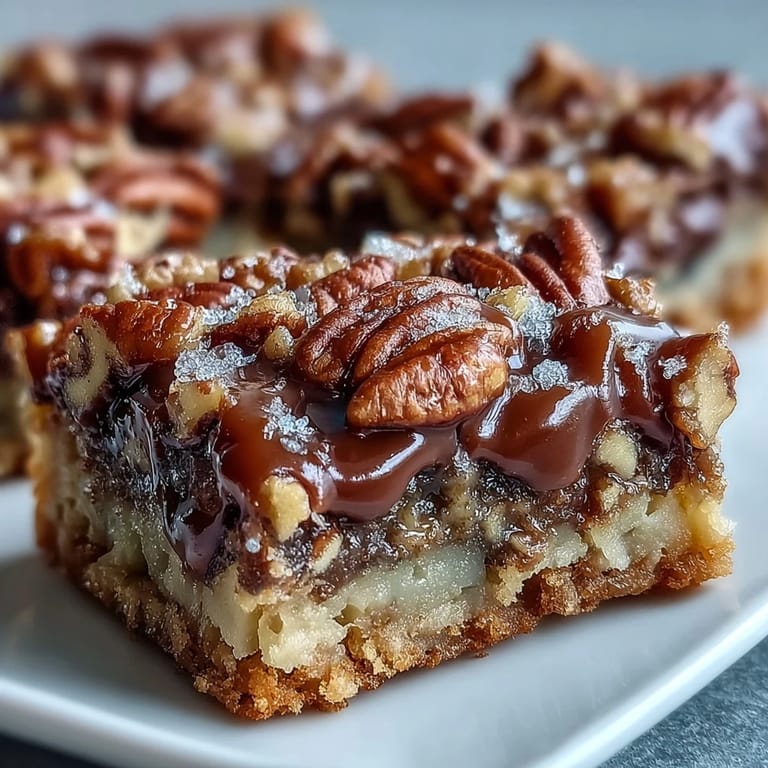
- Pecans: Their buttery texture becomes almost magical when they toast slightly during baking, and chopping them somewhat irregularly creates more interesting texture than uniform pieces.
- Chocolate chips: Semi sweet provides the perfect balance, though in a pinch Ive used dark chocolate chunks which created a more sophisticated flavor profile that my coffee loving friends particularly appreciated.
Tired of Takeout? 🥡
Get 10 meals you can make faster than delivery arrives. Seriously.
One email. No spam. Unsubscribe anytime.
Instructions
- Prepare your foundation:
- Preheat your oven to 350°F and line your 9x9 pan with parchment paper, leaving an overhang on two sides for easy lifting later. This simple step saved me countless broken bars before I learned it.
- Create the magical crumble:
- Combine your dry ingredients in a large bowl before pouring in that gloriously melted butter, watching as it transforms the powdery mixture into clusters that smell like heaven. Reserve a full cup for the topping, no skimping here.
- Form the base layer:
- Press the remaining crumble firmly into your prepared pan, using the bottom of a measuring cup to create a smooth, even surface. Youll want this layer sturdy enough to support all the goodness coming its way.
- Pre bake for perfection:
- Slide the pan into your preheated oven for just 10 minutes until it becomes slightly golden and your kitchen fills with the aroma of toasting oats. This short bake ensures your base wont become soggy under the weight of the filling.
- Prepare the luscious caramel:
- While the crust bakes, gently warm your caramel sauce with heavy cream in a small saucepan, stirring constantly until they become one silky mixture. The cream transforms the caramel into something that will set perfectly later, neither too hard nor too runny.
- Layer the indulgence:
- Once the crust comes out, immediately sprinkle the chocolate chips evenly across the hot surface, followed by a generous scattering of pecans. The residual heat will start melting the chocolate just enough to create that perfect bond with the crust.
- Add the caramel blanket:
- Pour your warm caramel mixture over the chocolate and pecans, using a spatula to ensure even coverage all the way to the edges. Watch as it seeps into the crevices between the nuts, creating little rivers of sweetness.
- Crown with crumble:
- Sprinkle your reserved crumb mixture over everything, allowing some caramel to peek through for that irresistible visual appeal. Resist the urge to press down, as the natural, uneven texture creates wonderful crispy edges.
- Bake to golden perfection:
- Return your creation to the oven for 15 20 minutes, until the top becomes a beautiful golden brown and your kitchen smells like a fancy bakery. The edges might bubble slightly with caramel, a promising sign of the chewy goodness to come.
- Exercise patience:
- Allow the bars to cool completely in the pan, which will take about 30 minutes, though Ive been known to speed things up in the refrigerator when willpower is low. This cooling time is crucial for the layers to set properly and develop their distinct textures.
 Save to Pinterest
 My colleague Thomas, who swore he was watching his sugar intake, took one bite of these bars during our department potluck and closed his eyes in silent appreciation before declaring they were worth every calorie. That evening, he texted me asking if the recipe could be doubled for his daughters graduation party, saying these reminded him of the turtle candies his grandmother used to make for special occasions. Somehow these humble bars had bridged generations and created a moment of pure connection.
Storage Tips
Ive discovered these bars actually improve with a day of rest, as the flavors meld and the textures settle into their perfect state. Store them in an airtight container with parchment paper between layers to prevent sticking, and theyll maintain their chewy goodness for up to a week, though in my house they rarely last beyond 48 hours. During summer months, I keep them in the refrigerator where they take on an almost fudge like quality that some of my friends actually prefer to the room temperature version.
Seasonal Variations
When autumn arrives, I often swap in some toasted pumpkin seeds alongside the pecans and add a pinch of cinnamon to the crumble mixture, creating a seasonal twist that pairs beautifully with hot apple cider. For winter holidays, a splash of bourbon in the caramel mixture and a dusting of flaky sea salt on top elevates these bars to sophisticated dinner party status, drawing appreciative murmurs from even the most discerning guests. Summer gatherings call for a lighter touch, where I sometimes press a few fresh raspberries into the caramel layer before adding the crumble topping, creating bursts of tartness that cut through the sweetness.
Serving Suggestions
These turtle bars stand perfectly well on their own, but Ive found a few accompaniments that take them to extraordinary heights depending on the occasion. A scoop of vanilla bean ice cream alongside a slightly warmed bar creates a dessert worthy of the finest restaurants, while a simple espresso provides the perfect bitter counterpoint to the sweet, complex flavors in each bite.
- For an elegant dessert platter, cut these into smaller diamonds instead of squares and arrange them alongside fresh berries and mint leaves for a color contrast that makes them even more irresistible.
- When packaging as gifts, wrap individual bars in parchment paper and tie with twine, then place in a decorative tin for a homemade treat that outshines any store bought option.
- Remember that a light dusting of powdered sugar just before serving can hide any imperfections in your bars and add a touch of visual snow that makes them look especially appealing on a dark plate.
 Save to Pinterest
 Whether shared at a potluck or savored quietly with afternoon tea, these turtle bars have a way of pausing time just long enough to remind us that the simplest pleasures are often the most meaningful. Im convinced there are few problems in life that cant be temporarily soothed by the perfect balance of chewy, crunchy, and caramelly goodness found in each square.
Common Recipe Questions
- → What makes these bars chewy versus cakey?
The combination of brown sugar, melted butter, and rolled oats creates a tender, chewy texture. Pressing the crust firmly before baking and allowing the bars to cool completely helps maintain that dense, satisfying bite rather than becoming fluffy or cake-like.
- → Can I use homemade caramel sauce?
Absolutely. Homemade caramel works beautifully here—simply combine sugar, butter, and heavy cream over medium heat until it reaches a rich amber color. The homemade version often delivers deeper caramel flavor than store-bought varieties.
- → Why do I need to reserve some crumb mixture?
Setting aside one cup of the oat crumb mixture before pressing the crust creates the essential topping layer. This golden, textured topping bakes over the caramel and chocolate, providing a delightful crunch and keeping the luscious fillings from bubbling over.
- → How do I know when the bars are fully baked?
The topping should turn a rich golden brown, and you might see small bubbles of caramel emerging around the edges. The bars will continue to set as they cool, so avoid overbaking—15 to 20 minutes for the final bake is typically perfect.
- → What's the best way to slice these bars cleanly?
Patience is key—let the bars cool completely in the pan before slicing. A sharp knife wiped clean between cuts helps create neat squares. For extra precision, chill the bars briefly in the refrigerator, then let them sit at room temperature for 10 minutes before serving.
- → Can I substitute different nuts?
Walnuts or almonds work well as alternatives to pecans. Each brings a slightly different flavor profile—walnuts add earthiness, while almonds contribute a mild sweetness. Toast them lightly beforehand to enhance their natural flavors.