 Save to Pinterest
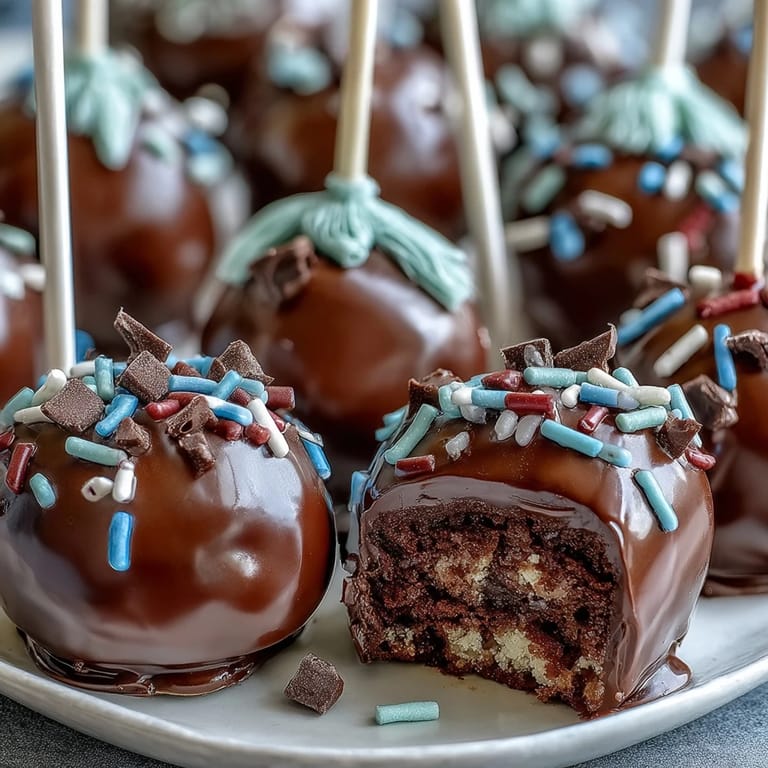
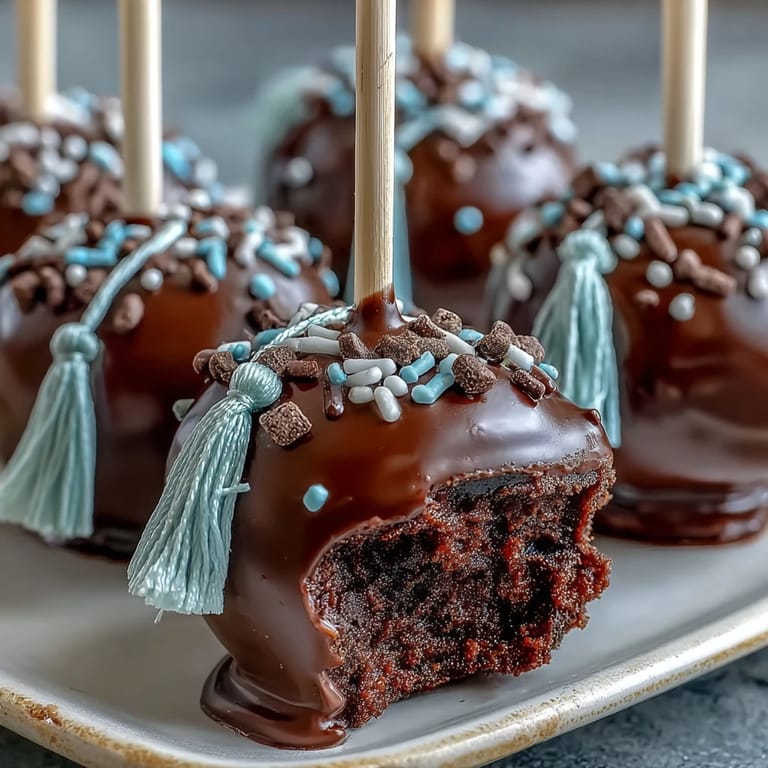
 The sound of applause echoing from the gym as graduates lined up outside always reminds me of those busy spring afternoons when I first crafted these graduation cake pops. The sweet scent of cake mingling with melted chocolate filled the kitchen as I matched colors to school banners, my hands dusted with bright sprinkles. There was a thrill in getting each shade just right—sometimes even more excitement than the ceremony itself. I confess, I once dropped a whole tray and scrambled to patch them up before guests arrived, but the laughter that followed made them even more special. That sense of celebration, with edible confetti and personalized pops, turned what could have been a simple dessert into a joyful centerpiece for milestone moments.
I remember the afternoon my cousin graduated—there was a whirlwind of family in the kitchen, everyone dipping and decorating their own pop. One uncle insisted on adding extra sparkle, and someone labeled theirs with a chocolate chip ‘2024’ in shaky script. Amid the mess and laughter, we compared notes on which school colors looked best and even debated the merits of glitter versus sprinkles. The spontaneous camaraderie of that day made these cake pops feel like more than just dessert—they became tokens of achievement shared between generations. By evening, every pop had found its owner, and the kitchen looked like a rainbow had exploded.
Ingredients
- Cake: Using a vanilla or chocolate boxed mix saves time, but home-baked cake lets you adjust the crumb for firmer pops—always cool thoroughly before crumbling to prevent sticky dough.
- Frosting: Cream cheese frosting makes pops rich and tangy; add it gradually until the mix binds easily without being too wet.
- Candy melts: Pick school colors, and melt gently—if the coating is stubborn, a spoonful of vegetable shortening ensures smoother dips.
- Sprinkles/glitter/sugar: Let your creative side run wild—they hide imperfections and make pops festive; prep toppings before dipping for quick, confident decorating.
- Lollipop sticks: Essential for easy serving and fun presentation—insert carefully so pops don’t crack.
- Mini chocolate chips: These tiny details transform cake pops into graduation caps or add whimsy; stick with melted chocolate for a secure hold.
- Fondant: Optional but perfect for caps—roll and cut squares ahead so you can assemble quickly while pops are still wet.
Tired of Takeout? 🥡
Get 10 meals you can make faster than delivery arrives. Seriously.
One email. No spam. Unsubscribe anytime.
Instructions
- Bake and Cool:
- Start by baking your cake according to the box or recipe and let it cool completely—warm cake crumbles messily and makes sticky pops.
- Crumble Cake:
- Use your hands to break the cake into fine crumbs, feeling for any big pieces and delighting in the softness between your fingers.
- Add Frosting:
- Mix in frosting gradually, using a spatula or your hands, until the cake feels moist and holds together—pause to check if you’ve reached the right sticky stage.
- Shape Pops:
- Scoop tablespoon-sized portions and roll into balls; aim for even shapes but don’t fuss if they’re imperfect—quirkiness is charming for celebrations.
- Chill Pops:
- Place balls on a lined sheet, cover, then refrigerate for an hour or freeze for twenty minutes; this helps them set and makes dipping easier.
- Melt Coating:
- Microwave candy melts or chocolate in bursts, stirring between each session—add vegetable shortening if needed for silky consistency.
- Stick and Dip:
- Dip the tip of each stick in melted coating, then insert halfway into each cake ball; this anchors the stick and helps prevent slipping when dipping.
- Coat Pops:
- Dip each pop fully in the coating, swirling and gently tapping to remove excess; admire the gloss before quickly moving to decorations.
- Decorate:
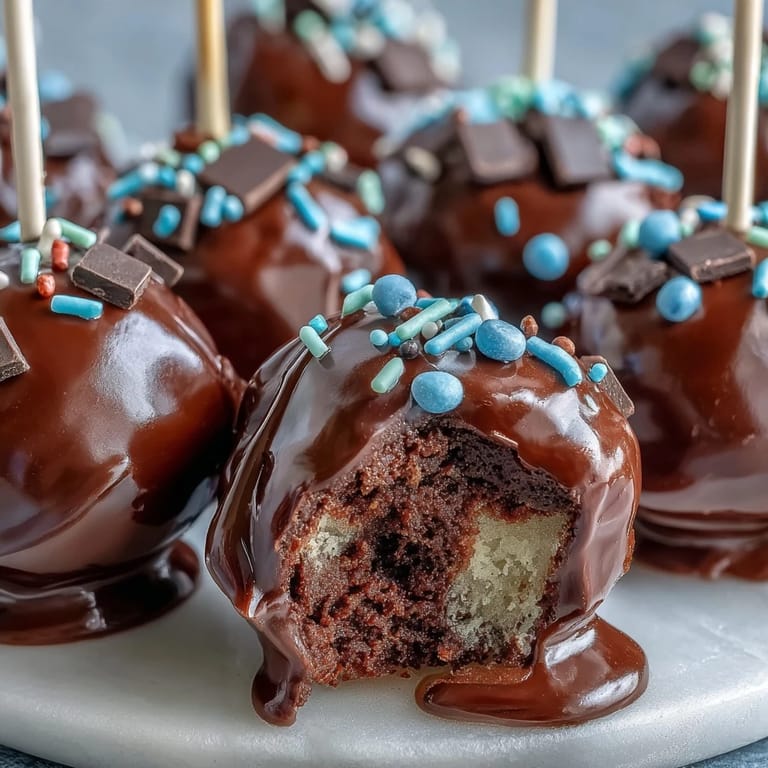
- While the coating is wet, add sprinkles, colored sugar, or cap decorations; for graduation hats, press fondant squares on top and attach a chocolate chip ‘tassel’ using a dab of melted coating.
- Set and Serve:
- Stand the cake pops upright in a styrofoam block or stand to set until firm and dry; resist touching them until the coating hardens, then share and celebrate.
 Save to Pinterest
 One of my favorite moments was seeing these cake pops served at a graduation picnic, each one proudly displaying school hues as the sun sparkled off their coating. An impromptu photo session broke out as grads juggled their pops for silly group shots, making dessert a real part of the celebration.
How to Keep Cake Pops Fresh for the Party
I learned after a few attempts that letting the cake pops cool fully before coating is non-negotiable. If stored in an airtight container at room temperature, their texture stays soft and the coating crisp for days—helpful when prepping ahead for a big event or surprise.
Best Ways to Color the Chocolate
Using proper candy melts guarantees bright, matched school colors, but white chocolate with gel coloring works in a pinch. I always melt the candy in short bursts and stir patiently to avoid seizing, as overheating can ruin the smooth finish.
Graduation Decorations—Personalizing Your Pops
Small details make these cake pops truly memorable: fondant caps, edible glitter, and initials or years on the side. I keep a tray of extra mini chocolate chips and sprinkles nearby so everyone can personalize their pop just before serving.
- Label pops with edible markers once they’re dry.
- Let each guest decorate one for interactive fun.
- Have backup sprinkles ready in case colors run out.
 Save to Pinterest
 Have fun letting your creativity shine with these cake pops. They turn any graduation celebration into a moment to remember, one bite at a time.
Common Recipe Questions
- → How do I choose the right cake flavor?
Select vanilla or chocolate cake based on preference. Use boxed mix or homemade for flexibility.
- → Can I customize the decoration colors?
Yes, use candy melts, chocolate, or fondant in your school’s colors to match graduation themes.
- → How do I prevent cake pops from cracking?
Let coated pops set at room temperature. Do not refrigerate immediately to avoid cracks.
- → What is the best way to serve cake pops?
Stand pops upright in a styrofoam block or decorative holder to showcase colors and keep coating intact.
- → Are cake pops suitable for gluten-free diets?
Use gluten-free cake mix and check all decorations for allergens to create gluten-free options.
- → How long can cake pops be stored?
Store pops in an airtight container up to 3 days at room temperature or up to a week refrigerated.