 Save to Pinterest
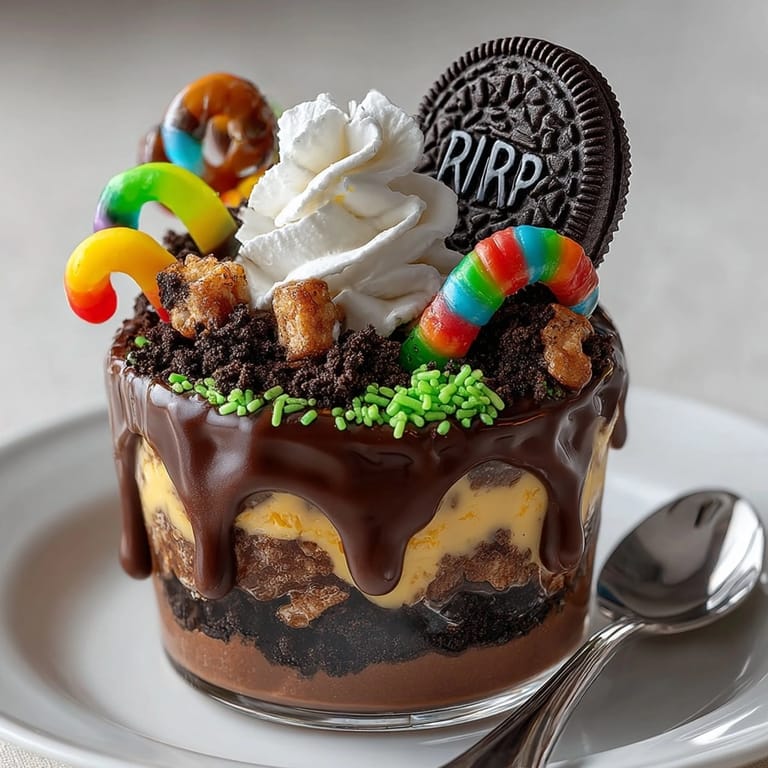
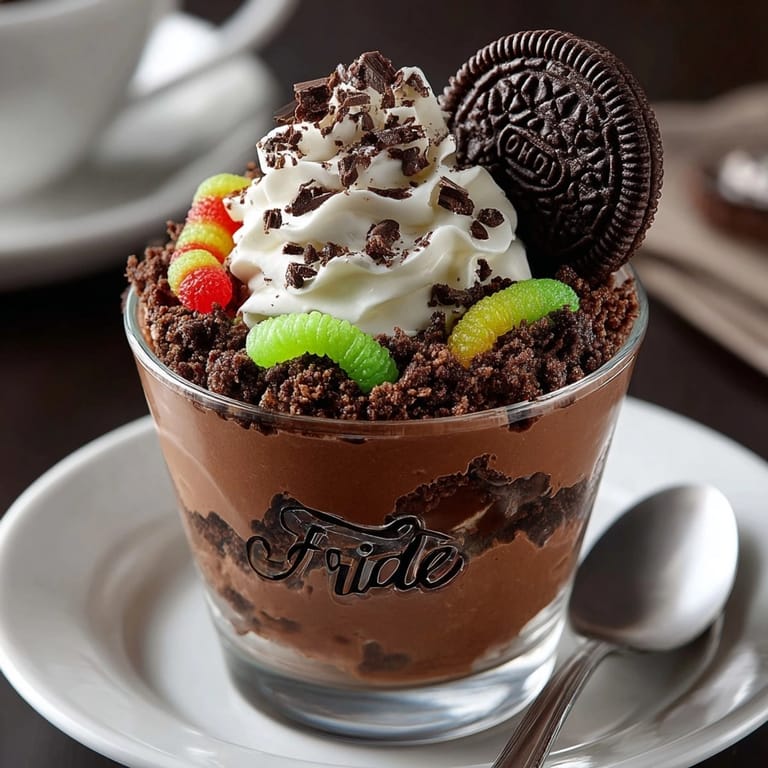
 This playful no-bake dessert has become my secret weapon for Halloween gatherings. My kids love assembling their own Haunted Graveyard Pudding Cups and I get to sneak in a little kitchen fun without turning on the oven. Rich chocolate pudding, crumbly cookie "dirt," and graveyard decorations come together in minutes for a treat that both delights and spooks.
The first time I brought these to a block party, they became the hit of the dessert table. The kids giggled at the gummy worms "crawling out" of the dirt and the grown ups loved the nostalgia. Now it is a yearly tradition at our house.
Ingredients
- Whole milk: makes the pudding extra creamy and rich so choose a fresh full fat option for best texture
- Instant chocolate pudding mix: the base layer that sets quickly and tastes decadent look for a reputable brand for deep cocoa flavor
- Chocolate sandwich cookies such as Oreos: for the "dirt" layer crush them well for a realistic look always check for maximum freshness
- Oval shaped chocolate cookies or biscuits: they serve as edible tombstones more fun with different shapes and sturdy enough to stand upright
- Whipped cream or whipped topping: adds lightness and ghostly accents go for real dairy if possible or a plant based version for allergies
- Assorted gummy worms: brings the graveyard scene to life and kids especially love them choose soft and colorful ones
- Black decorating gel or edible marker: lets you personalize the tombstones look for food safe marker pens or gel in the baking aisle
- Green sprinkles or shredded coconut: mimics grass use food coloring if dyeing coconut and opt for natural sprinkles when possible
Tired of Takeout? 🥡
Get 10 meals you can make faster than delivery arrives. Seriously.
One email. No spam. Unsubscribe anytime.
Instructions
- Prepare the Pudding:
- Whisk cold whole milk and instant chocolate pudding mix in a large mixing bowl for at least two minutes. This activates the thickening agents and ensures a smooth creamy base. Let the pudding sit undisturbed for five full minutes so it sets properly.
- Layer into Cups:
- Divide the set pudding evenly among eight small clear cups or jars. I like to use transparent containers so every part of the "graveyard" is visible from the side. Use a spoon to evenly scoop and smooth the surface.
- Crush the Cookies:
- Place chocolate sandwich cookies in a zip top bag or food processor and crush until fine. You want crumbles rather than dust these will look like real graveyard dirt and add a delicious crunch to every bite.
- Decorate the Tombstones:
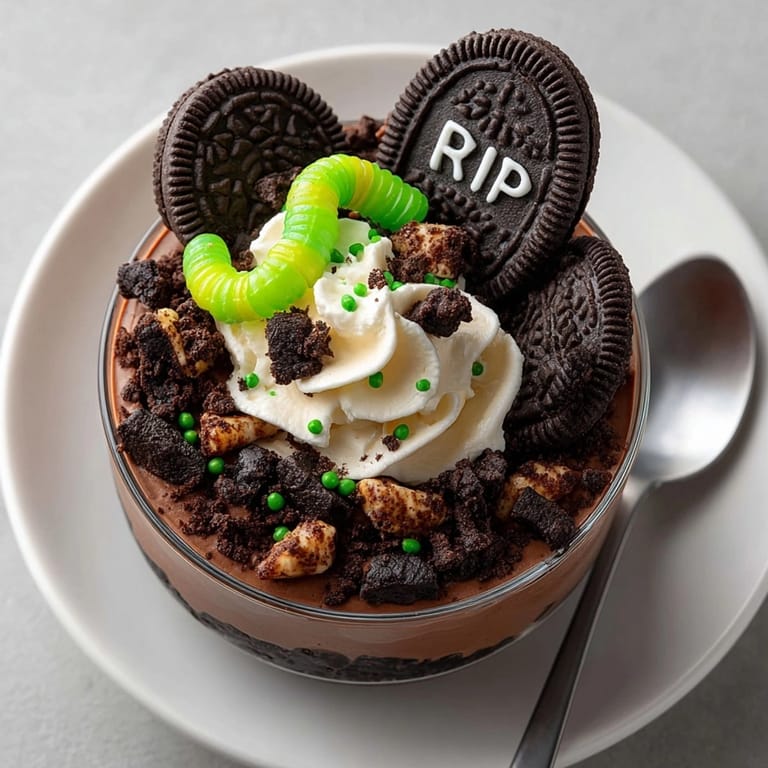
- Write ghostly phrases like RIP or BOO onto oval cookies with black decorating gel or edible marker. Feel free to get creative my family likes to add little bats or spider doodles for extra spookiness. Gently press one tombstone cookie into each pudding cup standing upright.
- Finish the Scene:
- Top each cup with gummy worms arranged crawling out of the dirt. Add bits of whipped cream as ghostly wisps and sprinkle on green coconut or sprinkles to mimic grass. Play with placement for a varied graveyard look.
- Chill and Serve:
- Refrigerate the finished cups until you are ready to serve them. This helps the layers settle and meld and ensures a cool refreshing dessert at party time.
 Save to Pinterest
 Creating tombstone cookies with silly phrases always gets everyone laughing and involved. My youngest once decorated hers with glittery bats it was so fun watching her and her friends compete for the funniest grave marker. For me the best ingredient is real whipped cream because its simple flavor balances the sweetness of the cookies and pudding.
Storage Tips
Pudding cups keep well in the refrigerator for up to twenty four hours if tightly covered. Avoid topping with whipped cream or sprinkles until just before serving to maintain the crispness and visual appeal. If making a few hours ahead freeze individual cookie tombstones to help them stay upright.
Ingredient Substitutions
For dairy free pudding use your favorite plant based milk and pudding mix labeled vegan. Gluten free cookies work perfectly as dirt and tombstones. You can substitute dairy whipped topping with coconut based or soy versions for a lighter allergy friendly treat.
Serving Suggestions
Serve each pudding cup with a tiny spoon so guests can dig up all layers. If hosting a party make a DIY station with assorted gummy candies and decorative gels so kids and adults can personalize their own graveyard. Pair with hot cocoa or apple cider for real autumn flair.
Cultural and Historical Context
No bake layered desserts grew in popularity in the United States as party friendly treats in the mid twentieth century. Halloween themed food traditions encourage imaginative presentation so recipes like this bring together simple ingredients with festive decorations for maximum fun.
Seasonal Adaptations
Turn pudding cups into snow covered graveyards with coconut flakes for winter parties. Swap chocolate cookies for gingerbread ones when making a Christmas version. Replace gummy worms with candy pumpkins or bats depending on the season.
 Save to Pinterest
 These pudding cups are a crowd pleaser for any holiday and the assembly process is fun for all ages. Make them ahead and enjoy a sweet spooky treat with minimal effort!