 Save to Pinterest
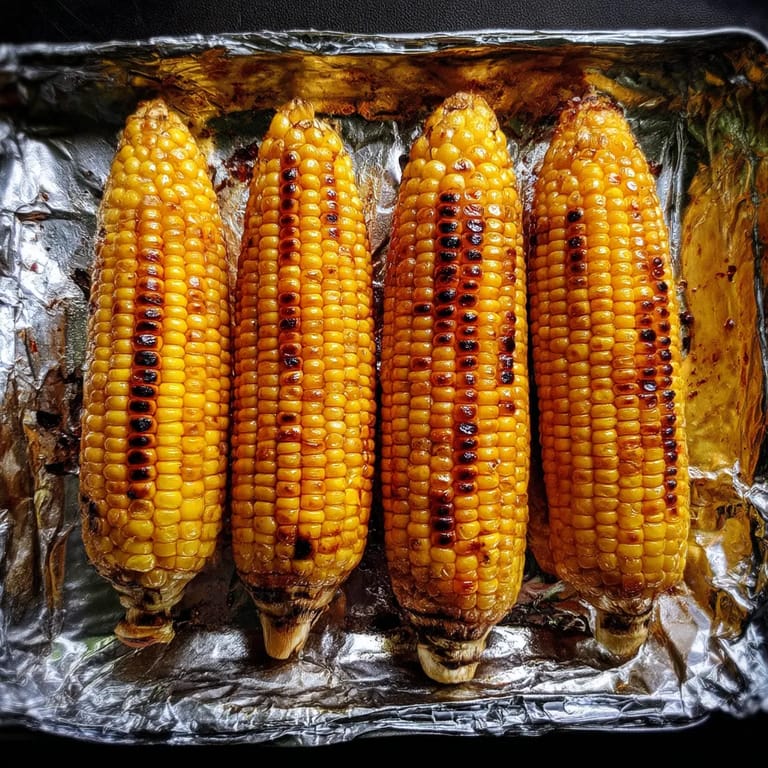
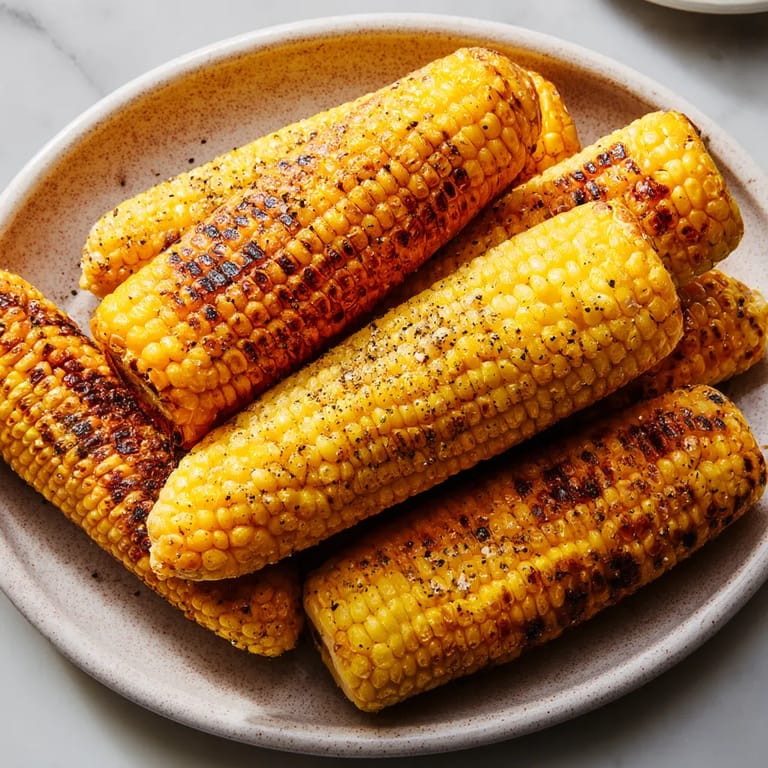
 This charred corn on the cob transforms a simple summer vegetable into a smoky, caramelized treat that highlights corn's natural sweetness. The gentle char from grilling adds complexity without overshadowing the corn's fresh flavor, making it a standout side dish that pairs with practically anything from your summer menu.
I first made this charred corn when hosting an impromptu backyard barbecue, and it's now requested at every summer gathering. Even my nephew, who claims to dislike vegetables, devours this corn without hesitation.
Ingredients
- Fresh corn still in husks Choosing corn with bright green husks and moist silk indicates freshness. Look for kernels that are plump and tightly packed for the juiciest results.
- Olive oil or butter Helps the corn char evenly and adds richness. I prefer using a high-quality olive oil for a subtle flavor that lets the corn shine.
- Salt and pepper Essential for bringing out corn's natural sweetness. Use flaky sea salt for added texture if available.
- Lime wedges The acidity balances the smoky sweetness. Choose plump limes that feel heavy for their size.
- Chili powder or smoked paprika Adds a wonderful dimension of heat or smokiness. Toast your spices briefly before using to enhance their flavor.
- Cotija cheese Provides a salty, crumbly contrast. If unavailable, feta or parmesan make good substitutes.
- Fresh cilantro Brightens the overall flavor profile with herbal notes. Look for bunches with vibrant green leaves.
Tired of Takeout? 🥡
Get 10 meals you can make faster than delivery arrives. Seriously.
One email. No spam. Unsubscribe anytime.
Step-by-Step Instructions
- Prepare the Corn
- Remove the husks and silk from each ear of corn, ensuring all silk strands are removed. Some prefer to keep a few inner layers of husk attached at the base to create a natural handle. Rinse the corn under cool water to remove any remaining silk threads, then pat completely dry with paper towels.
- Season the Corn
- Brush each ear thoroughly with olive oil or melted butter, ensuring complete coverage. This fat helps the corn char evenly and prevents sticking to the grill. Season generously with salt and pepper, rotating to coat all sides. The seasoning adheres better to the oil coated kernels.
- Preheat the Grill
- Heat your grill to medium high heat around 400°F. You want it hot enough to create nice grill marks but not so hot that the corn burns before cooking through. Allow at least 10 minutes for the grill to fully preheat for consistent results.
- Grill the Corn
- Place each ear directly on clean grill grates. Close the lid and cook for 2 to 3 minutes before rotating. Continue cooking and rotating every few minutes until the corn develops charred spots on all sides and the kernels are tender, about 10 to 12 minutes total. The kernels should look plump and slightly darker in color when done.
- Rest the Corn
- Remove the corn from the grill and allow it to rest for 1 to 2 minutes. This brief rest allows the corn to cool slightly for easier handling and lets the flavors settle. The corn will continue cooking slightly from residual heat.
- Add Toppings
- Apply your desired toppings while the corn is still warm. For Mexican street corn style, brush with mayonnaise, sprinkle with cotija cheese, dust with chili powder, squeeze fresh lime juice over top, and finish with chopped cilantro. For a simpler approach, just add an extra pat of butter and a sprinkle of salt.
 Save to Pinterest
 The most memorable thing about this recipe is its versatility. My family has a tradition of serving it with different toppings set out buffet style so everyone can customize their corn. The first time I made this for my in laws, my previously skeptical father in law declared it the best corn he had ever eaten and now requests it for every summer visit.
Grilling Alternatives
Not everyone has access to an outdoor grill, but you can still achieve delicious charred corn using other methods. A cast iron grill pan on the stovetop works wonderfully if preheated until very hot. Place the oiled corn in the pan and turn frequently until charred, about 10 minutes total. Alternatively, your oven broiler can create similar results. Position corn on a baking sheet about 6 inches from the broiler element, rotating every few minutes until charred on all sides. You can even use a gas stovetop burner in a pinch by holding the corn with tongs directly over the flame, turning constantly until charred all over.
Make-Ahead Ideas
Charred corn can easily be prepared in advance for larger gatherings. Grill the corn as directed, then cool completely. Refrigerate in an airtight container for up to 2 days. To reheat, wrap each ear in foil and warm in a 350°F oven for about 10 minutes, or microwave for 30 seconds per ear. You can also cut the kernels off and store them for adding to salads, salsas, or other dishes. The charred flavor actually deepens slightly after a day, making this a perfect prep ahead side dish.
Cutting Kernels Off the Cob
For those who prefer eating corn off the cob or using it in other recipes, there is a simple technique to remove the kernels cleanly. After grilling, allow the corn to cool until comfortable to handle. Stand an ear upright on its wider end on a cutting board. Using a sharp knife, cut downward along the cob in a gentle sawing motion, allowing the kernels to fall onto the board. Rotate and continue until all kernels are removed. To catch all the kernels and prevent them from scattering, place the corn in the center of a large bowl while cutting. These charred kernels make a wonderful addition to salads, salsas, pasta dishes, or rice bowls.
Save to Pinterest Common Recipe Questions
- → How do I know when the corn is perfectly charred?
The corn is perfectly charred when it has dark golden to black spots around the kernels, but isn't completely blackened. The kernels should appear plump and juicy, and when pierced with a knife, should feel tender. This typically takes 10-12 minutes on a medium-high grill, turning occasionally for even charring.
- → Can I prepare charred corn without a grill?
Absolutely! You can achieve similar results using a grill pan on high heat, turning frequently. Alternatively, place corn on a baking sheet under the broiler, about 4 inches from the heat source, rotating every 2-3 minutes until charred. A gas stovetop burner can also work in a pinch - hold corn with tongs and rotate directly over the flame.
- → What's the best way to serve charred corn?
Serve immediately while hot for the best flavor and texture. For a classic presentation, insert wooden skewers into the ends for easy handling. Create a DIY topping bar with lime wedges, different seasonings, cheeses, and herbs so everyone can customize their corn. It's delicious both on the cob or cut off and incorporated into salads and salsas.
- → Should I soak corn before grilling?
If grilling in husks, soaking for 15-30 minutes helps prevent the husks from burning too quickly and adds moisture. However, for this direct-char method with husked corn, soaking isn't necessary. Just brush with oil or butter to prevent sticking and help achieve those beautiful charred marks.
- → What varieties of corn work best for charring?
Sweet corn varieties like Silver Queen, Honey Select, or Supersweet work excellently for charring because their higher sugar content caramelizes beautifully on the grill. The freshest corn possible will give the best results - look for bright green husks and moist, yellow-white silks. When in season, local corn picked that day will offer the sweetest flavor.
- → How can I add more flavors to my charred corn?
Try infusing your butter or oil with garlic, herbs or spices before brushing. Mexican-style elote uses mayo or crema, cotija cheese, chili powder, lime and cilantro. For Asian flavors, brush with sesame oil and sprinkle with togarashi or Chinese five spice. Mediterranean-style uses herb butter and feta cheese. For sweet-heat, try honey butter with a pinch of cayenne.