 Save to Pinterest
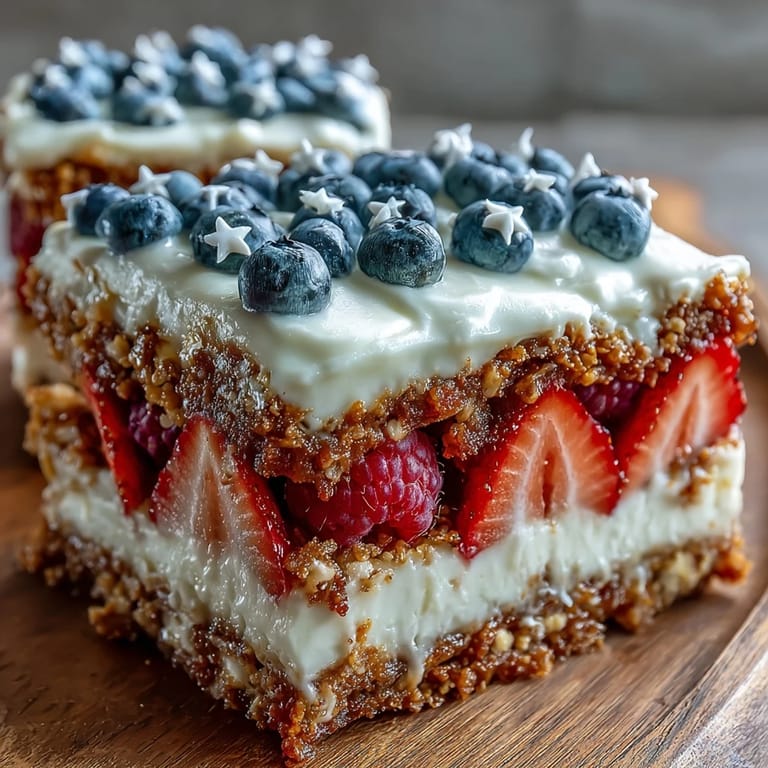
 The aroma of fresh berries mixed with tangy cream cheese would always remind me of the easygoing summer afternoons when the kitchen hummed with anticipation for a Fourth of July treat. One year, instead of turning on the oven, I decided to try a no-bake cheesecake flag cake after spotting a patriotic dessert idea in a magazine—my hands sticky with graham crackers, I grinned at the thought of assembling a flag from fruits. It was the kind of recipe that felt festive right from the first swirl of filling. There’s something magical about transforming simple ingredients into a centerpiece that draws everyone closer together. And honestly, watching the kids debate whether blueberries or strawberries are best is half the fun.
I once brought this cheesecake flag cake to a backyard fireworks party, where the neighbor’s dog circled the table suspiciously, drawn by the blueberry corner. Everyone gathered around to see the edible flag, and I felt a quiet triumph seeing the smiles it sparked. That first slice always gets everyone talking about favorite toppings and holiday memories, and even the adults sneak back for seconds. Messy hands and bursts of berry juice always follow, but that’s part of what makes the moment so lively.
Ingredients
- Graham cracker crumbs: A fine crumb ensures a sturdy base—pulse in a food processor for uniform texture.
- Unsalted butter: Melt it fully to help bind the crumbs; be sure it’s warm but not hot so the crust sets nicely.
- Granulated sugar: Just enough for sweetness without overwhelming the berries’ flavor.
- Salt: That tiny pinch balances the sweetness and brightens every layer.
- Cream cheese: Soften to room temperature, as cold cheese can leave lumps in your filling.
- Heavy whipping cream: Chill your bowl and beaters first for quicker, puffier peaks.
- Powdered sugar: Sifts in smoothly and avoids that grainy mouthfeel of granulated sugar.
- Vanilla extract: Adds warmth and dimension to the creamy base—choose pure if you can.
- Lemon zest (optional): Lightly grated to lift the flavor and cut richness.
- Fresh blueberries: Plump and firm berries hold shape and color to craft your flag’s stars.
- Fresh strawberries: Slice just before decorating so they stay vibrant and juicy for the stripes.
- Fresh raspberries (optional): Their bold color gives added pop to the red stripes or a tart contrast.
- Whipped cream (optional): Pipe for sharp white lines or dollop for extra indulgence.
Tired of Takeout? 🥡
Get 10 meals you can make faster than delivery arrives. Seriously.
One email. No spam. Unsubscribe anytime.
Instructions
- Mix the crust:
- In a medium bowl, stir graham cracker crumbs, melted butter, sugar, and salt until the crumbs are evenly moistened. The aroma will remind you of classic pie crusts, and the mixture should press together when squeezed.
- Press and chill:
- Transfer to your 9x13-inch dish, pressing firmly to an even layer using your fingers or a spatula. Chill the base for at least 10 minutes so it holds its shape for the creamy filling.
- Beat the cheesecake filling:
- With an electric mixer, beat the softened cream cheese until it’s luxuriously smooth. Blend in powdered sugar, vanilla, and lemon zest, pausing to scrape down the sides for a silky finish.
- Whip the cream:
- Grab a chilled bowl and whip the heavy cream until stiff peaks form, listening for the change in sound—it gets quieter as the cream thickens. Gently fold the whipped cream into the cream cheese mixture, making slow circles to keep the filling fluffy.
- Spread and smooth:
- Evenly layer the filling over the crust, smoothing with a spatula or offset knife. Take time for this part—an even layer means cleaner flag stripes.
- Arrange the berries:
- Place blueberries in the upper left corner for the stars, then create red stripes with strawberry slices and raspberries across the cake. Leave neat white spaces or pipe whipped cream between rows if you want crisp lines.
- Final touches and chill:
- If desired, finish piping whipped cream for definition. Cover your cake and refrigerate for at least 4 hours, until the topping is set and ready to slice cleanly.
- Serve:
- Cut into squares or rectangles, serve chilled, and enjoy with friends—watch for berry juice and big smiles.
 Save to Pinterest
 I’ll never forget the laughter when someone miscounted blueberry “stars” and insisted we make it historically accurate—ingenious improvisation ended with a flag sporting extra stars and a new inside joke. There’s something wonderful about dessert becoming part of the celebration rather than just an afterthought, and every year the kitchen fills with the cheerful chaos that makes the holiday feel complete.
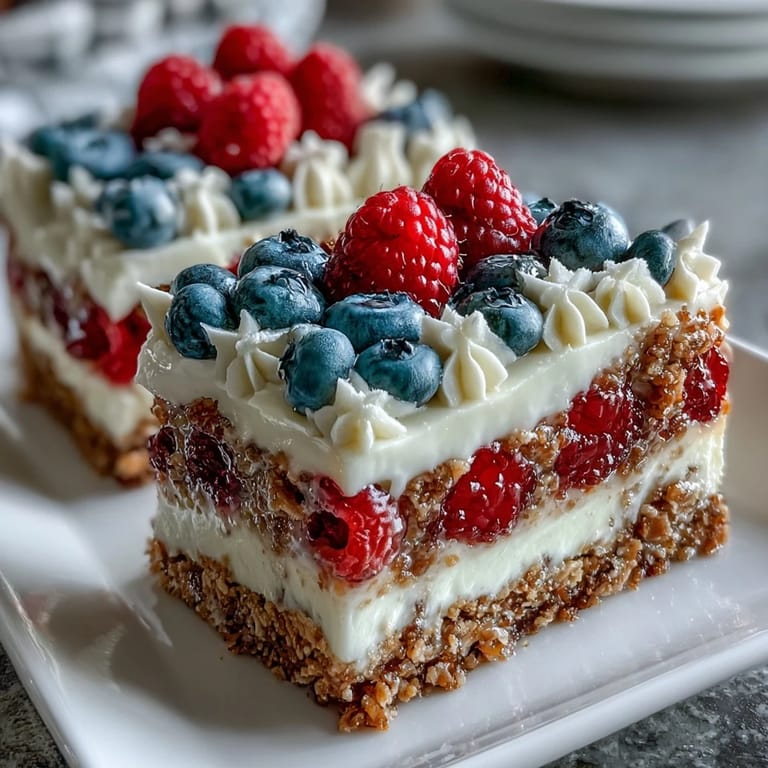
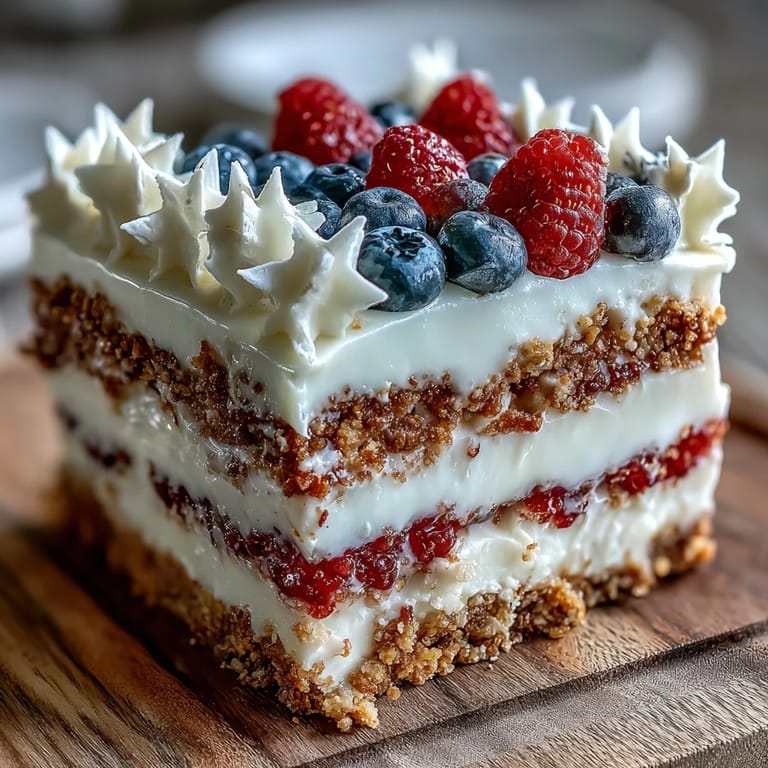
Assembling Your Edible Flag
Arranging the fruit for the flag always brings out everyone’s creativity. Placing berries gently and mixing raspberry stripes for bold color gives your cake a distinct look that makes guests snap photos before grabbing forks. Don’t stress if lines aren’t perfectly straight—the homemade charm is half the appeal, and a little whipped cream can hide any uneven spots.
Making Ahead for Stress-Free Holidays
One of my favorite lessons was discovering you could make this cake the night before, letting the flavors meld together and freeing up time for other festivities. Keeping the fruit off until just before serving keeps the flag bright and the berries fresh—no soggy stripes here. A quick run through with the offset spatula polishes the look if needed.
Serving and Storage Tips
Slicing the cake chilled yields crisp edges and preserves the flag shape for every plate. Cover leftovers tightly and return them to the fridge—there’s something delightful about sneaking cool, creamy bites the next morning. Gluten-free graham crackers work brilliantly for guests with allergies, so nobody has to miss out.
- Slice with a clean, sharp knife for neat squares.
- Add the fruit just before serving for brightest stripes.
- Keep it extra cold for picnics so the filling stays tally and creamy.
 Save to Pinterest
 May your Fourth of July be full of color and sweetness, with friends sharing laughter over each delicious slice. This no-bake cheesecake flag cake is my secret to easy celebrations and happy gatherings.
Common Recipe Questions
- → How is the flag design created?
Arrange blueberries in the corner for stars, and alternate rows of strawberries and filling for stripes.
- → Can I make this ahead of time?
Yes, prepare up to 24 hours in advance. Add fruit topping before serving for freshness.
- → Is the cake vegetarian?
This dessert is vegetarian, using dairy ingredients and no gelatin or meat products.
- → Can this be made gluten-free?
Swap regular graham crackers for gluten-free ones to make this dessert gluten-free.
- → What tools are needed?
Use a 9x13-inch baking dish, mixing bowls, electric mixer, spatula, and measuring tools.
- → How long does it need to chill?
Chill the dessert for at least 4 hours, or overnight for a firmer texture.